среда, 17 февраля 2010 г.

Blackened Brussels Sprouts

Blackened Brussels Sprouts
WSK-header

Before we dig into brussels sprouts, I need to give a gigantic shout out to Erin and Melissa for the redesign of Mountain Mama Cooks. I’ve been wanting to update my look and implement some new features for awhile now but held off until the timing was right. I knew right after meeting these two, that they were the gals to do the job. Together, they run Wooden Spoons Kitchen, a boutique web design and hosting company and if I do say so myself, they knocked it out of the park! Thank you doesn’t seem like enough. The entire process was inspiring, fluid and you gals gave me exactly what I wanted. Thank you for your patience, hard work and being all around super savvy, design maven, rock stars!


blackened brussels sprouts, www.mountainmamacooks.com

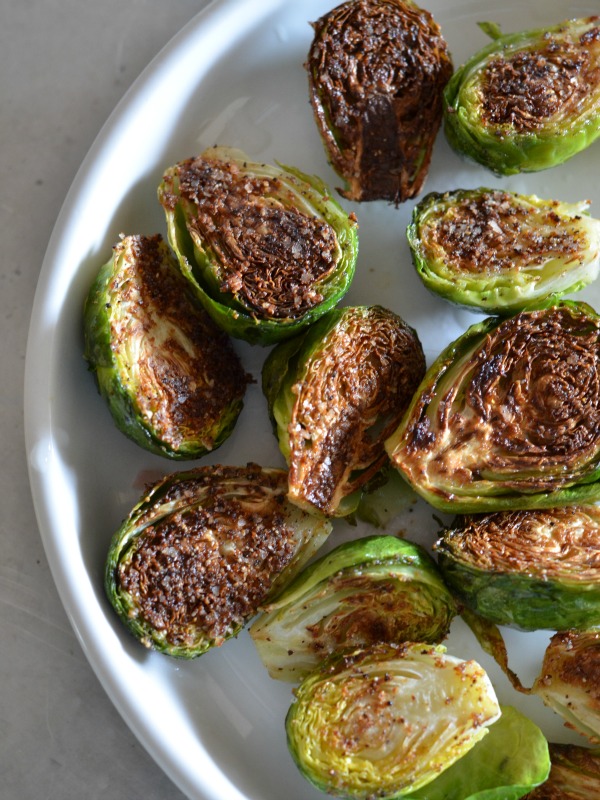
You know a recipe is good when you make it six times in two weeks. Never in my life did I think I’d be making brussels sprouts multiple times a week. And never in my life did I think I could possibly love brussels sprouts more than these roasted ones with crispy bacon and balsamic. But here I am to tell you that a) I’ve easily eaten 2+ lbs of brussels sprouts in the past 10 days and b) these ones are better than my beloved roasted version with bacon. The best part? They only take 8 minutes.


blackened brussels sprouts recipe-2, www.mountainmamacooks

I hosted a small brunch on Easter and since I was only a few days into my 21 day sugar detox, the menu was a ham cooked in the slow cooker, a veggie frittata, a spinach and avocado salad and these awesome pan seared brussels sprouts that my friend, Melissa made. It was all I could do to not eat all of them. Said no one ever about brussels sprouts…


8 minute brussels sprouts recipe, www.mountainmamacooks

Crispy and garlic loaded on one side, steamed to perfection, these are nuggets of veggie gold. Can you tell I haven’t had sugar in almost a month? I’m gushing about brussels sprouts. Man, someone get me a cookie stat. Or some ice cream. How about a piece of dark chocolate? You know at this point, I’d settle for an orange.


8 minute blackened brussels sprouts recipe, www.mountainmamacooks.com

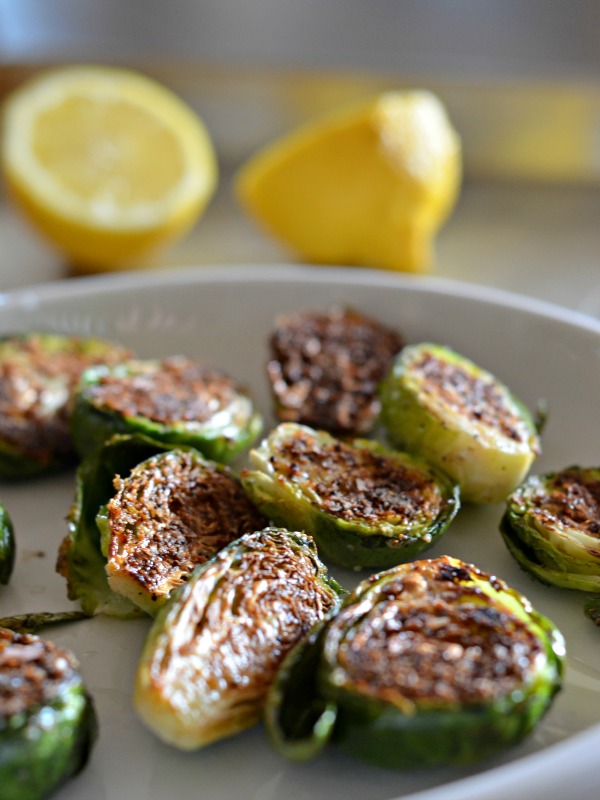
All joking aside, these brussels sprouts are out of this world. The key is using a stainless steal pan and heating it up so it’s piping hot when you lay the brussels in. The recipe below is more of a guide line. The recipe is forgiving and it’s easily adaptable to suit your taste. Play around until you get it right. The squeeze of lemon at the end makes takes ’em over the top. Don’t leave it out. Hope you all had a fabulous weekend!


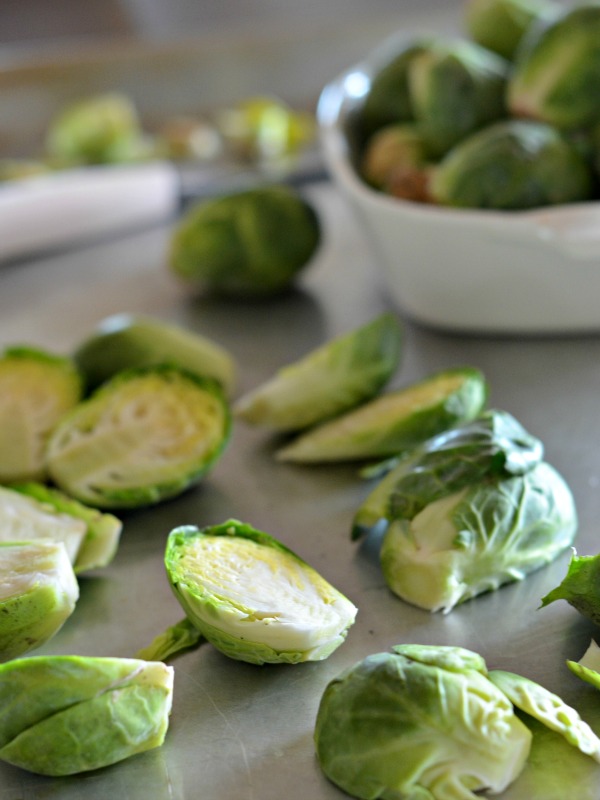
More of a guideline than a recipe, these brussels sprouts are just as easy to make for one as they are for a group. Play around until you get 'em just how you like them!


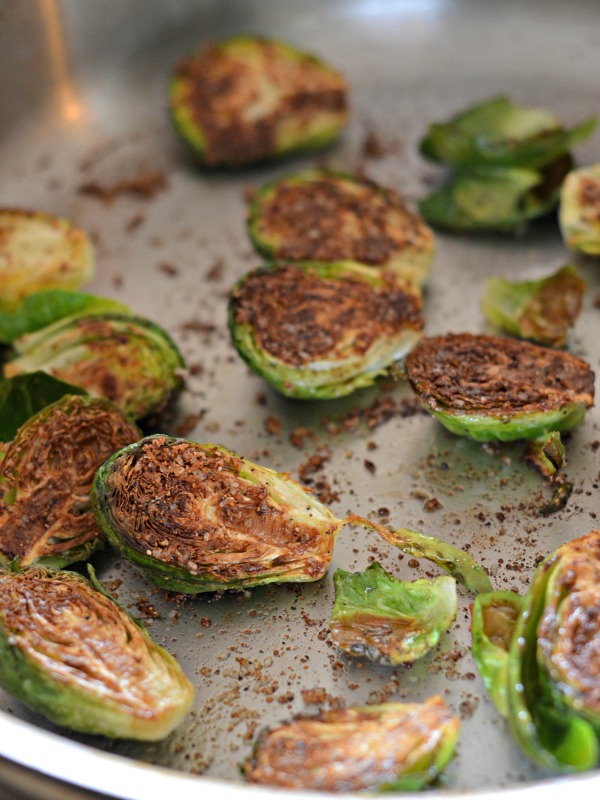
  1. In a stainless pan, heat a tablespoon or so of olive oil over medium-high heat.
  2. When pan is nice and hot (1-2 minutes), place brussels sprouts cut side down. If the brussels sizzle, that's a good sign!
  3. Place tight fitting lid on pan and turn heat to medium low.
  4. Set time for 8 minutes and don't lift pan lid or disturb the pan.
  5. When timer goes off, remove pan from heat and sprinkle brussels with a drizzle of fresh lemon juice.

Original article and pictures take www.mountainmamacooks.com site

вторник, 9 февраля 2010 г.

Bell Pepper Egg-in-a-hole

Bell Pepper Egg-in-a-hole

Print


The bell pepper adds gorgeous color and a very healthy veggie to your morning. Impress your family and breakfast guests with this Bell Pepper egg-in-a-hole.

My sister handed me a stack of old Martha Stewart magazines and I discovered this little gem. The bell pepper adds gorgeous color and a very healthy veggie to your morning. Did I mention it’s really easy?


You’ll definitely impress your family and breakfast guests with this bell pepper egg-in-a-hole. Thank you Martha! Serve the eggs-in-a-hole with buttered toast. English muffins are nice too. You can cook the eggs to the doneness you prefer.


Ingredients for Bell Pepper Egg-in-a-hole:


1 red bell pepper (yellow would probably work just as well)

4-5 large eggs

Salt

Pepper

1/4 cup grated parmesan cheese (other cheese would probably work too)

1 Tbsp Olive oil


How to Make Bell Pepper egg-in-a-hole for Breakfast:


1. In a large, non-stick skillet, heat 1 Tbsp olive oil over medium/high heat. Cut peppers into 1/2″ rings and remove the seeds and centers. Place sliced peppers into the pan and let them saute for a minute.


Bell Pepper Egg in a Hole-2

Bell Pepper Egg in a Hole-4

2. Crack one egg into the center of each bell pepper slice. Start pouring the egg in slowly; it prevents the egg from leaking and forms a nice seal, but some will leak no matter what; don’t fuss over it; it will still taste great!


Bell Pepper Egg in a Hole-5

The bell pepper adds gorgeous color and a very healthy veggie to your morning. Impress your family and breakfast guests with this Bell Pepper egg-in-a-hole.
Bell Pepper Egg in a Hole-6

3. Sprinkle salt and pepper over each egg. Saute for 3 minutes, then flip it over carefully.


The bell pepper adds gorgeous color and a very healthy veggie to your morning. Impress your family and breakfast guests with this Bell Pepper egg-in-a-hole.
Bell Pepper Egg in a Hole-8

The bell pepper adds gorgeous color and a very healthy veggie to your morning. Impress your family and breakfast guests with this Bell Pepper egg-in-a-hole.
Bell Pepper Egg in a Hole-9

4. Top with a generous amount of parmesan. If you want your yolks to be juicy (over easy), cook another minute.


The bell pepper adds gorgeous color and a very healthy veggie to your morning. Impress your family and breakfast guests with this Bell Pepper egg-in-a-hole.
Bell Pepper Egg in a Hole-10

The bell pepper adds gorgeous color and a very healthy veggie to your morning. Impress your family and breakfast guests with this Bell Pepper egg-in-a-hole.
Bell Pepper Egg in a Hole-11

P.S. As a (almost licensed) nurse, I feel compelled to say that eggs should be fully cooked for high risk populations including elderly, pregnant and young children.


Print


Bell Pepper Egg-in-a-hole


Ingredients


  • 4-5 large eggs
  • Salt
  • Pepper
  • ¼ cup grated Parmesan cheese

Instructions


  1. In a large, non-stick skillet, heat 1 Tbsp olive oil over medium/high heat.
  2. Cut peppers into ½" rings and remove the seeds and centers. Place sliced peppers into the pan and let them saute for a minute.
  3. Crack one egg into the center of each bell pepper slice. Start pouring the egg in slowly; it prevents the egg from leaking and forms a nice seal.
  4. Sprinkle salt and pepper over each egg. Saute for 3 minutes, then flip it over carefully.
  5. Top with a generous amount of Parmesan cheese. If you want your yolks to be juicy (over easy), cook another minute.

Final Final Picmonkey Hashtag banner

Original article and pictures take natashaskitchen.com site

понедельник, 18 января 2010 г.

Becky's Meatballs (C1)

Becky's Meatballs (C1)

Recipe Author:Becky Yokeley Love


Don't ever accuse me of making perfectly round meatballs! ~Simmie


1-2 lbs ground turkey


1-2 diced onions

3/4-1c ketchup

few tbsp grape jelly probably equalling 1/4-1/2c


Bake at 350 for 45 min - hour


This recipe is also available as Becky's Meatloaf, at:


http://17ddgal.blogspot.com/2011/12/beckys-meatloaf-c1.html

If you make the BBQ sauce in book its WONDERFUL :) Meatballs cook for 20-30 min then put them in crock pot with a bit of water for rest of day :)


Simmie Note:

You could also use salsa or sweet chili sauce in place of the ketchup!


Original article and pictures take 17ddgal.blogspot.com site

понедельник, 28 декабря 2009 г.

Be Kind to Your Liver, Your Ass Will Thank You Later

Be Kind to Your Liver, Your Ass Will Thank You Later
Detox and Cleanse Your Liver
Detox your liver (take out the trash) and jumpstart your weight loss! #17DayDiet

Ever wonder why you start the 17 Day Diet off with detox by elimination of sugars, unhealthy fats and carbohydrates? Is it to help you lose weight quickly? Sure. Or is it maybe for another reason?


You may have heard that body detox and cleanses are good for your liver, among other things.


Well, when your liver is overloaded with toxins, it is nearly impossible for your liver to rid your body of the dangerous toxins and to help your body digest foods and fats.


If you start a weight loss regimen without first detoxing or cleansing your body (and liver), you may have a difficult time losing actual fat. You may lose water weight at first, but most people who have a buildup of toxins in their body stop right there.


Think of your body as you do a trash can. You put garbage into your trash can and there it sits under the sink for days at a time. You take your trash and place it into the main trash bin where it sits outside your house, for maybe a week. It’s finally trash day and you have piles of trash waiting on the curb to be picked up and hauled away.


Think of your liver as the garbage man who picks up your pile of trash from the curb and takes it to the dump.


If your liver is filled with toxins, it will not be able to properly rid your body of the “garbage” — this is unhealthy and makes for losing weight very difficult.


If your liver is not working properly because it’s overloaded with toxins, you may experience any of the following and more:


  1. Extreme fatigue
  2. Bloated Stomach
  3. Blood sugar problems
  4. Hormone imbalance

Cleansing your liver thoroughly prior to starting your weight loss program will allow your liver to be more effective in its job, allowing for proper digestion and weight loss.


Some of the natural cleansing foods to help rid your body of such toxins include the following:


  1. Garlic
  2. Grapefruit
  3. Beets and carrots
  4. Green Tea
  5. Leafy green veggies

Do these foods sound familiar? They should if you’re on the 17 Day Diet.


If you are experiencing some of these symptoms or if you are not losing weight even if you’re following the 17 Day Diet to the “T”, consider a complete Detox/Cleansing program to help rid your liver and body of these deadly toxins and to allow you to be healthy once again.


Original article and pictures take 17ddblog.com site

вторник, 15 декабря 2009 г.

Balsamic Roasted Brussels Sprouts and Carrots

Balsamic Roasted Brussels Sprouts and Carrots
Balsamic Roasted Brussels Sprouts and Carrots - a perfect way to put a bit of flavor back into your veggies!

It’s easy to get bored with your regular veggie routine. You know what I’m referring to – steamed carrots, steamed broccoli, steam this and that. Enough already! I found a wonderful recipe that highlights the natural flavors of the vegetables, but adds in the the luxurious flavor of Balsamic vinegar. Yes, I described it as luxurious! If you think of your flavors this way, you feel like a million bucks!


Balsamic Roasted Brussels Sprouts and Carrots


Ingredients:


2 tablespoons balsamic vinegar

1 tablespoon olive oil

1 tablespoon maple syrup note: either use Stevia or omit all together

2 cloves garlic, minced

1/2 teaspoon dried thyme

1 1/2 pounds brussels sprouts, halved

6 carrots, cut diagonally in 1 1/2-inch-thick slices

Kosher salt and freshly ground black pepper, to taste

1/4 cup dried cranberries

2 tablespoons chopped fresh parsley leaves


Directions:


Preheat oven to 400 degrees F.


Lightly oil a baking sheet or coat with nonstick spray.


In a small bowl, whisk together balsamic vinegar, olive oil, maple syrup, garlic and thyme; set aside.


Place brussels sprouts and carrots in a single layer onto the prepared baking sheet. Stir in balsamic vinegar mixture; season with salt and pepper, to taste.


Place into oven and bake until browned and tender, about 20-25 minutes.


Serve immediately with cranberries, garnished with parsley, if desired.


Yields 2-3 Servings


Approved for all cycles


You can check out my original #repost of this recipe on Instagram. Check out the original recipe creator here.


Jazz up your boring veggies with this Balsamic Roasted Brussels Sprouts and Carrots recipe! It's going to be a family hit!

Photo courtesy of @damn_delicious


Original article and pictures take 17ddblog.com site

четверг, 26 ноября 2009 г.

Baked Turkey and Spinach Meatballs

Baked Turkey and Spinach Meatballs

Ingredients


  • 1 pound Ground Turkey
  • 1 cup chop Spinach
  • ⅓ cups dice Green Onion (Scallion)
  • 2 tablespoons Ketchup
  • 1 teaspoon Salt
  • ½ teaspoons Black Pepper
  • ½ cups Parmesan Cheese, Dairy Free

Freezer Containers


Supplies


Nutritional Information


24 minutes


These directions are for cooking this recipe to serve immediately and NOT to freeze for later.


  1. Grease a baking pan. Set aside.
  2. Combine all ingredients in a large bowl. Mix thoroughly.
  3. Shape into 1-inch balls.
  4. Place in prepared baking dish.
  5. Bake at 375F for 15 minutes or until fully cooked.

37 minutes


Freeze For Later


These directions help you cook or prepare this meal PRIOR to being frozen for serving later (see Serving Day Directions when you are ready to prepare it to eat).


Why would I want to freeze this?


  1. Grease baking pans. Set aside.
  2. Combine all ingredients in a large bowl. Mix thoroughly.
  3. Shape into 1-inch balls.
  4. Place in prepared baking dish.
  5. Bake at 375F for 15 minutes or until fully cooked.
  6. Allow to cool.
  7. Divide meatballs among indicated number of gallon freezer bags, label, and freeze.

3 minutes


These directions help you cook or reheat this meal AFTER it's been frozen for when you are ready to eat it.


  1. Heat through in microwave for 2-3 minutes or until heated through.

Original article and pictures take assets.onceamonthmeals.com site

четверг, 12 ноября 2009 г.

Baked Chicken with Tomatoes, Basil and Red Chillies

Baked Chicken with Tomatoes, Basil and Red Chillies

There’s nothing as easy as a big pan of baked chicken and veggies for a delicious weeknight dinner. And this recipe is so good you’ll be making it for all your guests too!


Yesterday I shared a round up of healthy one-dish meals with you. It got me thinking of one of my favorite one-dish meals. It’s chicken baked with lots of tomatoes, chilies and basil. Add some bread to soak up the tomato and chicken juices and you’re good to go. It’s not only an easy and healthy meal, it’s also one of the most delicious things that I cook. Here’s how the recipe came about.


Easy Baked Chicken with Tomatoes, Basil and Red Chillies

We were visiting my brother-in-law and his family in London and his wife, Maria, was making dinner. I was sipping a glass of wine and planning to chat with her while she cooked. Except she finished cooking really quickly.


All she’d done was throw a bunch of stuff in the pan and slam it in the oven. For us. For company.


Easy Baked Chicken with Tomatoes, Basil and Red Chillies
I was pretty surprised since I know her to be an extremely good cook.

But then I tasted it.


And then I knew why she’d made it for us. For company.


It was fantastic. Tons of flavor. Juicy chicken. A tiny bit of heat from red chillies. The fresh flavor of basil tying it altogether.


Easy Baked Chicken with Tomatoes, Basil and Red Chillies

I fell in love.


And now I regularly make Maria’s Baked Chicken for us. And for company.


Here’s how I make Baked Chicken with Tomatoes, Basil and Red Chillies.


The recipe is based on what I saw Maria do in her London kitchen.


Print Recipe

Video by Leigh Olson. Article, photos and recipe by Christine Pittman.


This recipe was originally posted in April of 2014, revised in August 2016.


Original article and pictures take cookthestory.com site

понедельник, 26 октября 2009 г.

Baked Asparagus with Parmesan

Baked Asparagus with Parmesan

Baked Asparagus with olive oil and parmesan cheese. Easy and elegant!


Baked Asparagus
Photography Credit: Elise Bauer

Are you ready for asparagus season? This has to be one of the easiest ways to cook asparagus. Just trim the ends, lay out on a foil lined baking sheet, toss with olive oil, sprinkle with salt, pepper, and Parm, and then bake until done. I eat them like French fries. Addictive? Yes.


They’re a perfect side to salmon, scallops, shrimp, or ham and delicious with eggs of any kind—poached, fried, or hard boiled.


Baked Asparagus

Baked Asparagus with Parmesan Recipe


1 Prep the asparagus: Preheat oven to 400°F (205°C). Break or cut off the woody ends of the asparagus spears. For an added touch, if you want you can use a vegetable peeler to peel the skins off the base of the asparagus spears for a more elegant presentation.


2 Toss with olive oil, salt, pepper, Parm: Arrange the asparagus spears on a foil-lined baking sheet and coat with the olive oil. Sprinkle with salt, pepper and the Parmesan.


3 Bake: Bake at 400°F until the cheese begins to brown, about 8-10 minutes.


Hello! All photos and content are copyright protected. Please do not use our photos without prior written permission. If you wish to republish this recipe, please rewrite the recipe in your own unique words and link back to Baked Asparagus with Parmesan on Simply Recipes. Thank you!


Links:


Baked Halibut with Asparagus, Leeks and Dill, from Gluten Free Girl


Miso Ginger Baked Asparagus, from Steamy Kitchen


Baked Asparagus with Balsamic Vinegar, from Two Peas and their Pod


Baked Asparagus

Original article and pictures take www.simplyrecipes.com site

пятница, 16 октября 2009 г.

Asparagus Delight

Asparagus Delight

Phase 2 recipe with phase 3 additions


Asparagus and Tomatoes


Ingredients:


  • 1 bunch fresh asparagus, trimmed
  • 2/3 cup water
  • 1/2 cup grated Parmesan cheese (for Phase 3 or Phase 4)
  • 10 grape tomatoes, halved

Directions:


Combine the asparagus and water in a 10-inch skillet and place over medium heat; cover. Allow the asparagus to steam until tender, about 10 minutes; drain. Reduce heat to low and return the skillet to the heat. Drizzle oil over the asparagus; sprinkle with Parmesan cheese. Add the grape tomatoes to the skillet and replace the lid. Allow to sit covered until the cheese melts and the tomatoes are slightly steamed, about 2 minutes.


Click here for MCT Oil

Click here for Coconut Oil


Original article and pictures take www.miracleskinnydrops.com site

вторник, 6 октября 2009 г.

Asparagus and Mushroom Stir-Fry

Asparagus and Mushroom Stir-Fry

Save


I've got a little news to share before we dive face first into this delicious plate. I finally put The Garden Grazer on Instagram! Woop! Come join and tag me with any recipes you make - I'd LOVE to see what you guys are cooking up! And now back to your regularly scheduled programming... ��


This simple, flavorful dish is a great side for any Asian-inspired meal. You can also turn it into a main course with tofu, tempeh, or other protein of your choice. Of course feel free to change it up using your own favorite stir-fry ingredients. Snow peas, onion, bell pepper, bok choy, broccoli, celery, bean sprouts, etc. are all awesome in this. I used two of my very favorites this time with asparagus and mushroom. The sauce is pretty thin, so if you'd like a thicker sauce add arrowroot, cornstarch, or other thickening agent (like in this Broccoli with Asian Garlic Sauce). Works great either way! The thin sauce works nice when serving with rice because the juices merge everything together. My husband and I both really love this dish. Hope you do too!


Vegan, gluten-free (with tamari)

Serves about 4 as a side


Ingredients

1 lb. asparagus

1 lb. mushrooms

2 Tbsp. sesame oil


{For the sauce}

1/2 cup vegetable broth

2 Tbsp. low-sodium soy sauce or tamari

1 tsp. sesame oil

2 cloves garlic, minced

Optional: 1 Tbsp. cornstarch (for a thicker sauce)


Directions

Make the sauce: add all ingredients to a small bowl and stir to combine. Set aside.

Halve or quarter the mushrooms, and cut the asparagus into 1-2 inch pieces.

In a large skillet or wok over med-high heat, add 2 Tbsp. sesame oil.

When hot, carefully add the mushrooms and cook for about 2 minutes.

Add the asparagus. Stirring often, cook for 3-4 minutes.

Add the sauce and cook for a couple more minutes, or until vegetables reach desired tenderness.

When serving, there will be sauce remaining in the pan that I like to spoon over the veggies (or rice/quinoa if you're using!)


{Printer Friendly Version}


Other Asian inspiration!


Original article and pictures take www.thegardengrazer.com site

четверг, 10 сентября 2009 г.

Asparagus and Eggs for the 17 Day Diet

Asparagus and Eggs for the 17 Day Diet
Asparagus and Eggs - a perfect low-carb breakfast recipe for the 17 Day Diet

Finding interesting and new ideas for low-carb breakfast menus for the 17 Day Diet can be tricky. Here’s a delicious egg dish that features asparagus! This breakfast recipe was featured during the Fall C1 Challenge and participants gobbled it up!


Asparagus and Eggs


Ingredients


5-6 stalks Asparagus

1 teaspoon olive oil

¼ teaspoon salt

2 eggs

¼ cup parmesan cheese

Pepper to taste


Directions


Heat olive oil in pan over medium heat. Cut off ends of asparagus and add to skillet along with salt. Fully coat asparagus and cook until tender, 4-5 minutes.


In the pan, spread asparagus out and crack eggs in the center. Sprinkle cheese over asparagus and eggs. Cover and let cook until egg whites are firm and yolk is done to desired consistency. Sprinkle with pepper and serve.


Note: You may also fry eggs in separate pan if easier, or poach eggs if you prefer a different cooking style without oil.


Yields 1 Serving


17daylifestylemagissue2

Download the Special Issue #2 of 17 Day Lifestyle Magazine


If you enjoyed this recipe, consider downloading issue 2 of the 17 Day Lifestyle Magazine, available on Apple and Android, where you’ll receive this recipe along with others in a 7-day meal plan with recipes.


Original article and pictures take 17ddblog.com site

понедельник, 31 августа 2009 г.

artsy-foodie.com

artsy-foodie.com

2017 Copyright. All Rights Reserved.


The Sponsored Listings displayed above are served automatically by a third party. Neither the service provider nor the domain owner maintain any relationship with the advertisers. In case of trademark issues please contact the domain owner directly (contact information can be found in whois).


Privacy Policy


Original article and pictures take www.artsy-foodie.com site

пятница, 21 августа 2009 г.

Apple Cider Vinaigrette Recipe (and health benefits, too!)

Apple Cider Vinaigrette Recipe (and health benefits, too!)
Apple Cider Vinegar has so many health benefits - here's a recipe for a super easy and yummy Vinaigrette!

A while back, I published a neat infographic focused on a 2-Day Post Holiday Detox that got a lot of attention on Pinterest.


I received emails asking for a recipe for Apple Cider Vinaigrette, a key ingredient in the 2-Day Detox, so I decided to post my recipe to the blog.

But before I do, I wanted to share a few key points on some of the health benefits of apple cider vinegar.


Some people believe:


1. Apple Cider Vinegar may lower glucose levels

2. Apple Cider Vinegar may lower cholesterol

3. Apple Cider Vinegar may lower blood pressure

4. Apple Cider Vinegar may lower your chances for certain types of cancers

5. Apple Cider Vinegar may help you lose weight


While some serious “dieters” will just pour Apple Cider Vinegar straight onto their salad, I prefer to mix a little bit of ingredients together and make a yummy vinaigrette. Here’s a VERY simple recipe. Remember, the key is adjust flavorings/amounts to your liking, but here’s a starter to get you going.


Apple Cider Vinaigrette


Ingredients:


2-4 Tablespoons Apple Cider Vinegar

1/4 Cup of Olive Oil (or more to taste)

Sweetener to taste

Salt and Pepper to taste

Garlic powder to taste

Splash of lemon juice (optional)

Zest of 1/2 lemon (optional)

Dijon mustard to taste (optional)


Directions:


Pour apple cider vinegar into bowl. Slowly whisk in oil (keep tasting until you achieve the balance you prefer– I enjoy more on the tart side). Add your sweetener, salt, pepper and garlic powder to taste. For that added zing, add a splash of lemon juice. For an extra added zing, add zest of 1/2 lemon.


The key to great apple cider vinaigrette for me is to adjust the flavorings until you get the flavor you desire. Most times I prefer a tart and sweeter vinaigrette and other times I opt for a subtle, smooth tasting dressing. It really depends on what you’re serving it with and your mood! Enjoy!


I’d love to hear how you adjust the recipe to your liking.


Original article and pictures take 17ddblog.com site