среда, 1 декабря 2010 г.

Chicken and Broccoli Bake

Chicken and Broccoli Bake
Chicken Broccoli Bake - a yummy and healthy dinner entree for the 17 Day Diet

This recipe I’ve featured in a few past Challenges as well as my Yummy! recipe book for Cycle 1 of the 17 Day Diet. This version is from my book (the Challenge version is slightly different, but I like this one better, plus it’s easier to make).


The photo above is courtesy of Diane Perrier, a member of my 17DD Blog Facebook Community!


Chicken and Broccoli Bake


Ingredients


3 Tablespoons olive oil

1 pound boneless chicken breasts, diced

salt and pepper, to taste

2 large broccoli heads, florets removed

2 garlic cloves, minced or grated

1/2 cup diced white onion

1/2 cup low-sodium vegetable or chicken broth

1/4 tsp dried thyme

1/4 tsp dried parsley

1/4 tsp onion powder

1 cup shredded parmesan cheese

1/2 cup shredded low-fat mozzarella cheese


Directions


Preheat the oven to 400 degrees F.


Heat an oven-safe skillet over medium heat and add 1 tbsp olive oil. Season the chicken with salt and pepper and cook until slightly browned and cooked through. Remove the chicken and any juice from the skillet and add to a bowl.


Bring a pot of salted water to a boil. Add the broccoli florets and cook until tender, about 2-3 minutes. Drain.


Using the same skillet from the chicken, heat the remaining 2 tbsp olive oil over medium-high heat. Add garlic and onion and cook for 5-8 minutes or until the onion is very soft and translucent.


Whisk in the broth to the onion mixture and stir until it thickens, about 2 minutes. Add the thyme, parsley and onion powder.


Stir the cooked chicken, the broccoli florets into the mix and toss to combine.


Remove from the heat and sprinkle the cheese over the top. Cover with foil and bake for 25 minutes or until the cheese is melted. Remove the foil and broil until the cheese is lightly brown, about 1-2 minutes.


Yields 4 Servings


Approved all cycles


Chicken and Broccoli Bake


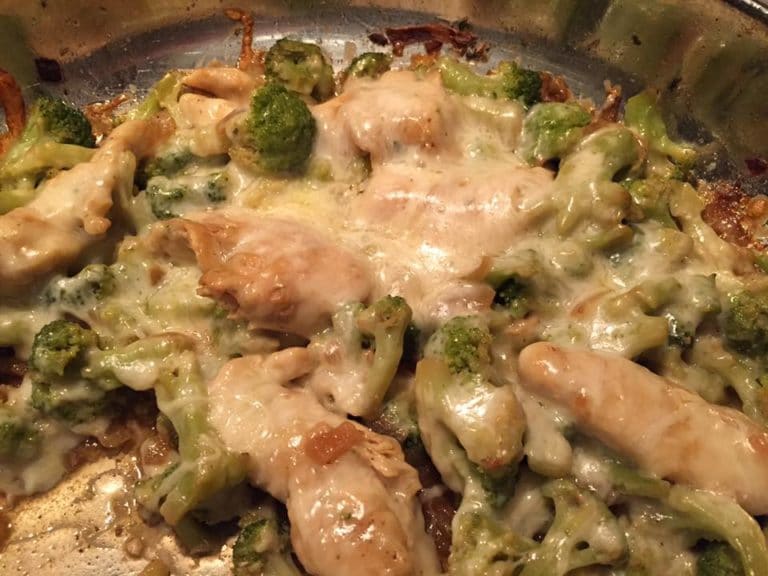
Photos Courtesy of Cari G. Follow Cari on Instagram.


Original article and pictures take 17ddblog.com site

среда, 10 ноября 2010 г.

Cauliflower Tortillas

Cauliflower Tortillas
Low-Carb Cauliflower Tortillas for the 17 Day Diet

A member of my community was craving a low-carb tortilla to use with my Slow Cooker Mexican Cilantro Chicken recipe I recently introduced in my C1 Challenge. She made a few adjustments from another cauliflower hash brown recipe I provided and came up with a Cauliflower Tortilla solution! Here’s Wendy’s version:


Cauliflower Tortillas


Ingredients


1 large head of cauliflower

2 large Eggs

1/2 to 3/4 cup non or low-fat shredded cheddar cheese (enough cheese to bind everything together)

1/2 teaspoon garlic powder

1/2 teaspoon paprika

Salt and Pepper, to taste


Directions


Preheat oven to 400 degrees F.


Remove florets from head of cauliflower and rinse well.


In a medium size bowl, add your cauliflower florets and microwave on high for 3 minutes, or steam them on the stove top in a large pot, until cauliflower is cooked.


Allow cauliflower to cool for a few minutes. In a large bowl, mash the cauliflower until you reach a smooth consistency.


Place mashed cauliflower into either paper towels or a clean kitchen towel and squeeze all excess liquid from cauliflower. It’s really important to get as much as the liquid out of the cauliflower as possible.


Wendy’s tip: squeeze all liquid from cauliflower until your cauliflower resembles “sawdust” type of consistency and dryness.


Add all other ingredients to cauliflower mixture into a bowl and mix well to combine.


On a greased baking sheet, form 6 to 10 round-shaped tortillas (your number of tortillas may vary depending on the size and thickness of your tortillas).


Bake for 15 minutes on each side, or until golden brown.


Allow to rest for 7 to 10 minutes to allow tortillas to firm up prior to serving.


Wendy’s tip: make these earlier in the day if you can, and toast them up prior to dinner to get them a little crunchy!


Yields 6-10 tortillas, depending on the size you make them.


Approved for all cycles


Low-Carb and Loving It! Cauliflower Tortillas for your Next Taco Tuesday

Photo courtesy of Wendy Y.


Original article and pictures take 17ddblog.com site

среда, 3 ноября 2010 г.

Cauliflower Soup with Toasted Pine Nuts

Cauliflower Soup with Toasted Pine Nuts

Silky cauliflower soup gets a creamy, tangy flavor boost from plain yogurt which pairs perfectly with dried mint and toasted pine nuts.


creamy cauliflower

Brisk Fall days practically beg for a satisfying bowl of warm soup. As a proud member of Stonyfield Organic’s Clean Plate Club, I decided to create a recipe using local, seasonal produce that incorporates one of my favorite foods: plain yogurt.


It can be tempting to celebrate the season with heavy comfort foods but wouldn’t it be great to ring in the new year already feeling good about ourselves? Don’t get me wrong, there is a time and place for hot, fresh cider donuts but don’t forget to fill the body with good things, too!


Speaking of good things, cauliflower might not be bright red or leafy green but it is LOADED in health benefits:


  • Full of B vitamins including riboflavin, niacin and thiamine.
  • A natural source of dietary fiber, cauliflower helps promote digestive health while also keeping you fuller, longer.
  • Pregnant? Cauliflower is a great source of folate which helps prevent birth defects.
  • Antioxidant-rich cauliflower has been shown to reduce the risk of cancer, heart disease and stroke.
  • An excellent source of Vitamin C, loading up on cauliflower is a great way to strengthen the body’s immune function – just in time for cold and flu season!

Even better? Cauliflower is affordable, versatile, readily available and absolutely delicious.


Your fork is waiting.


Original article and pictures take cdn.thelemonbowl.com site

среда, 13 октября 2010 г.

Cauliflower Parsnip Mash with Roasted Garlic

Cauliflower Parsnip Mash with Roasted Garlic

A while ago I posted this simple cauliflower mash that is still quite a popular recipe. Since the holiday season is here I thought it would be nice to experiment a bit more with the idea of using cauliflower in a mash. I made this delicious cauliflower parsnip mash with roasted garlic. You’ll only need a few ingredients and you can let your blender do all the ”mashing”.


Cauliflower Parsnip Mash with Roasted Garlic

I usually use parsnip in recipes when I roast veggies or I add it to a soup, but parsnip in a mash is delicious too! It brings such a delicious, almost nutty flavor to this mash. Of course, the roasted garlic is also a game changer when it comes to bringing flavor into a recipe.


If you are a potato mash lover, you’ll for sure love this mash too. Whereas my previous cauliflower mash is on the light side when it comes to taste compared to a real potato mash, this recipe is much more rich in taste. Of course, you could just make a real potato mash if that is the flavor you like, but I love cauliflower a lot and wanted to create a cauliflower mash with more richness in taste and texture.


Although the name says ”mash” it’s actually a puree because there’s no mashing involved. I just blended everything in a powerful blender.


This recipe makes a great side dish for the holiday season, but I know I’ll make this mash way more often!


If you give this mash a try, I’d love to know. Leave a comment below or let me know on Facebook or Instagram. Oh and don’t forget to tag your picture #thegreencreator on Instagram. I’d love to see your recreations!

Cauliflower Parsnip Mash with Roasted Garlic

Save Print

This cauliflower mash is delicious and rich in taste because of the added parsnip and roasted garlic and you can let your blender do all the work.


  • CAULIFLOWER PARSNIP MASH:
  • 5 medium parsnips (1 lb) peeled & chopped into 1-inch chunks
  • 1 medium head cauliflower (~2 lbs), broken into pieces
  • 2 tablespoons nutritional yeast
  • ½ tablespoon fresh lemon juice
  • ½ teaspoon sea salt (optional) I used onion powder instead….
  • 1 teaspoon minced rosemary
  • freshly ground black pepper, to taste
  • 5 macadamia nuts, roasted and crushed for the topping
  • one spring onion for the topping
  • ROASTED GARLIC (use 4 fresh roasted cloves in the mash):
  • 1 head garlic

  1. Slice the macadamia nuts with a knife or transfer to a dry kitchen towel and smash with the flat side of a knife to create chunks.
  2. Roast the garlic: Preheat the oven to 350°F. Cut a ½-inch slice off the top of the whole head of garlic to expose the cloves and place cut-side up on parchment paper.
  3. Roast for 20 to 30 minutes or until golden and tender. In the last 5-7 minutes add the macadamia chunks.
  4. Bring a large pot of water to a boil. Cook the parsnips and cauliflower for 10 to 15 minutes or until tender. Scoop into a blender.
  5. Add 4 to 5 cloves of the roasted garlic to the blender along with the nutritional yeast, lemon juice, salt, and a pinch of pepper. Blend to a smooth consistency.
  6. Taste and add additional salt, onion powder or nutritional yeast if desired
  7. Transfer to a serving bowl and stir in the rosemary. Add more pepper, if desired, and top with roasted macadamia chunks and spring onion.

This recipe reheats perfectly - the flavors become more integrated and delicious the next day. Store for up to 3 days in the fridge. Reheat in the oven or microwave and stir before transferring to a serving dish.


Original article and pictures take thegreencreator.com site

понедельник, 20 сентября 2010 г.

Cauliflower Nachos

Cauliflower Nachos
Yummy Cauliflower Nachos that help you lose weight instead of gain! Super easy and super delish!

Trying to lose weight means giving up your favorite salty, cheesy and carb-filled favorite dish: nachos….or does it?


If you’ve been around the 17 Day Diet block for a while, you’ll notice a trend with cauliflower — substitute your favorite carbs for this versatile veggie, and you instantly have a healthier version of your favorite comfort food. Here’s a dish a fellow 17dd’er, Michelle L., recently made. She made a few tweaks to the original recipe and had herself a healthy dish! It’s super easy and very yummy!


Cauliflower Nachos


Ingredients:


2 small heads (or 1 large head) cauliflower, chopped

3 tbsp. extra-virgin olive oil

1 tsp. kosher salt

1/2 tsp. cumin

1/2 tsp. paprika

1/4 tsp. chili powder

1/4 tsp. garlic powder

1/2 c. low-fat cheddar cheese, shredded

Low-sugar Salsa, for serving

Green onions for garnish


Directions:


Preheat oven to 425 degrees F.


Add cauliflower to a large baking pan or dish and drizzle with olive oil. Mix all spices and salt together and sprinkle over cauliflower. Toss to coat.


Roast in the oven for 35-40 minutes until golden and crispy. Check about half way through and gently toss cauliflower, if needed.


Top with cheese and return to oven until melted, about 5 minutes more.


Garnish with your favorite low-sugar salsa and diced green onions.


Yields 3-4 servings.


Approved for all cycles.


Cauliflower Nachos - this is a super easy and tasty dish that agrees with your waist line! Try it!

Photo Courtesy of Michelle L. Follow Michelle on Instagram and you’ll fall in love with her feed of yummy food!


Original recipe can be found here.


Original article and pictures take 17ddblog.com site

Cauliflower Crusted Pizza!!

Cauliflower Crusted Pizza!!

Report Inappropriate Recipe


Introduction


Are you on the 17 Day Diet (including cycle 1), are you looking for a low fat and low cal version of pizza but with a non diety taste? Look No further! I LOVE PIZZA ( i even have a poem on my blog) and when I started the 17 DD I thought it was loong gone out my life but recipe has totally changed me! You can split with others or have it all for yourself (4 serv. equals only 540 cal.!) Enjoy!


Ingredients


Directions


Preheat oven to 450 degrees Fahrenheit.


Spray a cookie sheet with non-stick spray.


In a medium bowl, combine cauliflower, egg and mozzarella. Press

evenly on the pan. Sprinkle evenly with garlic powder, oregano and parsley.


Bake at 450 degrees for 12-15 minutes.


While the crust is cooking, cook up your toppings if needed. For this pizza I used chopped chicken breasts, mushrooms and 1/2 of a large onion and sauted til cooked and tender in cooking spray.


Remove the pan from the oven. To the crust, add sauce, then toppings and cheese.


If you're entertaining you can cut into 4 slices or if you've good all week and need a nice feeling meal of comfort make it personal for under 550 calories!


Serving Size: Makes 4 slices


Number of Servings: 4


Recipe submitted by SparkPeople user CHRISTAL9.


Original article and pictures take www.sparkpeople.com site

пятница, 20 августа 2010 г.

Carrot & Apple Soup

Carrot & Apple Soup
Mmmmm - Apple & Carrot Soup is a delicious is a savory soup perfect for a cold day!

A recipe I featured on My 17dd Blog’s C1 Challenge was Carrot soup. The recipe was initially met with some hesitation due to the ingredients, but after participants tried the concoction, they were blown away! Where cumin is listed, feel free to substitute with your own favorite spice such as cinnamon, ginger or something entirely different!


This recipe is approved for all cycles. However, you may want to eat the soup for your lunch as it contains a good amount of fruit. Enjoy!


Carrot & Apple Soup


Ingredients


2 tablespoons Olive Oil

1 onion, chopped

1 tablespoon chopped garlic

2 apples, peeled, cored, and diced

4 carrots, peeled and cut into 1/4-inch pieces

4 cups low-sodium, non-fat vegetable broth

1 teaspoon cumin (or your favorite spice)

Salt and pepper

Chopped chives or parsley, as garnish (optional)


Directions


Heat olive oil in a medium saucepan. Add onion and garlic and sauté until softened, about 4 minutes. Add apple and carrots and sauté for 2 minutes.


Add the vegetable broth and cumin; bring to a boil. Reduce heat to a simmer and cook until the apples and carrots are soft, about 15 to 20 minutes.


Remove from the heat and puree with an immersion blender or, in batches, in a blender. Season soup with salt and pepper. Garnish with chives or parsley and serve.


Yields 3- 4 Servings


Enjoy your veggies and fruit inside this decadent, but easy-to-make soup! Carrot & Apple soup is the perfect lunch for your 17 Day Diet weight loss plan! Pin for recipe

Original article and pictures take 17ddblog.com site

среда, 21 июля 2010 г.

Buffalo Chicken Stuffed Mushrooms

Buffalo Chicken Stuffed Mushrooms

Buffalo Chicken Stuffed Mushrooms, a gluten free and easy stuffed mushroom recipe with chicken, blue cheese, ranch, celery, carrots, and red onion.


(For your shopping convenience, this post contains affiliate links.)


Buffalo Chicken Stuffed Mushrooms recipe - gluten free appetizer | SnappyGourmet.com

Another Buffalo Chicken recipe for all my “Buffalo” lovers! All the flavors of buffalo chicken wings but stuffed in a mushroom! These Buffalo Chicken Stuffed Mushrooms are perfect for a dinner party, tailgating, or just because you’re in the mood! I actually ate a bunch of them for lunch the other day. :) You could easily make these into a vegetarian appetizer or swap out the chicken for shrimp. Let the party begin!!!


Buffalo Chicken Stuffed Mushrooms recipe - gluten free appetizer | SnappyGourmet.com

These Buffalo Chicken Stuffed Mushrooms are easy to make and you can even make them ahead of time. Start with some mushrooms either button or baby bella (crimini) mushrooms. Remove the stems and using a small spoon or fork, scoop out a bit of the inside to make room for the filling. You can discard the stems and inside or keep for another use. I like to chop it all up and put on salads or cook and add to pastas, sauces, soups, or all sorts of things!


Buffalo Chicken Stuffed Mushrooms recipe - gluten free appetizer | SnappyGourmet.com

Once your mushrooms are ready to go. Chop up all your veggies and chicken. You could substitute additional vegetables or chopped precooked shrimp if you’d rather. Make sure everything is FINELY chopped.


Buffalo Chicken Stuffed Mushrooms recipe - gluten free appetizer | SnappyGourmet.com

Mix your filling together in a bowl. Start with a little Frank’s Hot Sauce then add more in to your personal liking. The filling is almost like a buffalo chicken dip. Or think buffalo hot wings stuffed in a mushroom! Yum!


Buffalo Chicken Stuffed Mushrooms recipe - gluten free appetizer | SnappyGourmet.com

Stuff your mushrooms with a small spoon then top with blue cheese. Bake for about 8-10 minutes or until mushrooms are soft and cooked through and cheese is soft and melted on top.


Buffalo Chicken Stuffed Mushrooms recipe - gluten free appetizer | SnappyGourmet.com

Serve warm. They reheat fairly well and I’ve also been known to eat a few cold on occasion, but your guest might not go for that. :) Hope you enjoy the recipe!


Buffalo Chicken Stuffed Mushrooms recipe - gluten free appetizer | SnappyGourmet.com
Here are a few more of my “Buffalo” recipes I thought you might enjoy:

Buffalo Chicken Stuffed Mushrooms recipe - gluten free appetizer | SnappyGourmet.com

Hope you enjoy!


A few more stuffed mushroom recipes you might enjoy:


Original article and pictures take i1.wp.com site

пятница, 9 июля 2010 г.

Buffalo Chicken Salad

Buffalo Chicken Salad


Back in grad school when I started compulsively watching The Food Network, Racheal Ray’s 30 Minute Meals was one of my favorite cooking shows. I was a cooking novice, so her familiar ingredients, straightforward cooking techniques, and quick preparation of meals appealed to me. I had just moved in with John at that point, and most of Rachael’s dishes were comprised of foods we both liked. I was also drawn to her spunky personality and down-to-earth vibe.


That was then.


Now, I rarely watch Rachael’s new cooking show and I stay as far away from her talk show as I can. I suppose you could say I’ve joined the ranks of folks who can’t stand Racheal Ray. In order to keep this post from becoming a rant, I will refrain from listing her traits that I now find incessantly obnoxious. What I will do is admit that I still enjoy browsing through, and gaining inspiration from, Rachael’s recipes. This Buffalo Chicken Salad was inspired by not one, but two of her recipes.


Ever since I became a buffalo sauce fan convert, I’ve been keeping an eye out for recipes featuring the spicy condiment. While sifting through Food Network’s online compilation of recipes, I stumbled upon a salad concocted by none other than RR. The salad (linked below) was comprised of buffalo sauce-drenched chicken, crisp romaine lettuce, crunchy carrots, ranch salad dressing, and blue cheese.


I knew instantaneously that this was the kind of salad that John and I would both enjoy as a light dinner. I researched recipes for homemade ranch dressing, and found a recipe by RR (also linked below) that could easily be adapted to fit my nutrition standards. The combination of low fat buttermilk and 2% plain Greek yogurt was the perfect base mixture for fresh herbs and crumbled blue cheese; the finished product was a rich, flavorful, slightly tangy, and healthy ranch-blue cheese dressing hybrid.


If you’re looking for a man-approved entree salad, look no further. When served with a few whole wheat rolls to round out the meal, this Buffalo Chicken Salad is sure to fill you up while keeping you light.


Thanks, Rachael Ray.


Buffalo Chicken Salad


inspired by Rachael Ray


Ingredients:


  • 4 cups chopped romaine hearts
  • 1 large carrot, shredded
  • 1/2 cup homemade buttermilk ranch dressing (recipe follows)*
  • 1/4 cup crumbled blue cheese, plus more for garnish if desired
  • 1 large boneless, skinless chicken breast
  • extra virgin olive oil
  • Kosher salt and freshly ground black pepper to taste
  • 1 Tbsp butter
  • 1 1/2 tsp Worcestershire sauce
  • 1 Tbsp hot sauce (add more if desired)
  • 1/4 cup canned tomato sauce

Directions:


  1. Combine chopped lettuce and shredded carrots in a large mixing bowl. Set aside.
  2. Combine 1/2 cup homemade buttermilk ranch dressing and blue cheese crumbles in a small bowl. Mix well and set aside.
  3. Heat a drizzle of olive oil in a skillet over medium-high heat.
  4. Season chicken with salt and pepper, add to heated pan, and cook until done, about 4 minutes per side. Remove chicken from pan and set aside to cool. Once cool enough to handle, cut chicken into bite-sized pieces. Reduce stove heat to low.
  5. Melt butter in the skillet and stir in Worcestershire, hot sauce, and tomato sauce. Stir to combine and remove from heat. Add the cooked chicken to the buffalo sauce, and stir to coat evenly.
  6. Toss the lettuce and carrots with the dressing, and top with the buffalo chicken pieces and additional crumbled blue cheese, if using.

*Homemade Buttermilk Ranch Dressing


adapted from Rachael Ray


yields 1 1/2 cups


Ingredients:


  • 3/4 cup low fat buttermilk
  • 3/4 cup 2% plain Greek yogurt
  • 1 clove garlic, grated
  • 1 Tbsp white wine vinegar
  • 1 tsp hot sauce
  • 2 Tbsp finely chopped parsley
  • 2 Tbsp finely chopped dill
  • 2 Tbsp finely chopped chives
  • Kosher salt and freshly ground black pepper, to taste

Directions:


  1. Whisk all ingredients together in a small bowl. Store in the refrigerator in an airtight container.


Original article and pictures take www.healthyfoodforliving.com site

среда, 30 июня 2010 г.

Buffalo Chicken Salad with Greek Yogurt (modified for the 17 Day Diet)

Buffalo Chicken Salad with Greek Yogurt (modified for the 17 Day Diet)
Buffalo Chicken Salad with Greek Yogurt - modified for the 17 Day Diet

As I was browsing Pinterest for inspiring culinary creations, I stumbled upon this delicious-looking Buffalo Chicken Salad recipe that a health blogger had adapted from an original recipe to make it healthier. Well, I’ve modified the adapted version just a tab bit to make it 17 Day Diet approved.


Here it is…


Buffalo Chicken Salad with Greek Yogurt


5 oz non-fat plain Greek yogurt

1/3 cup Franks Red Hot Wings Buffalo sauce

1/2 tsp garlic powder

1/4 tsp fresh ground black pepper

1 lb boneless, skinless chicken breast, shredded

2 celery stalks, finely chopped

1/2 cup cilantro, minced

1/2 cup (2 oz) low-fat mozzarella cheese


Directions:


In a large bowl, whisk together yogurt, buffalo sauce, garlic powder, and black pepper. Stir in chicken, celery, cilantro, and low-fat mozzarella cheese. Refrigerate until serving or up to 5 days in the fridge.


Yield: 4 cups chicken salad


Cycles 1 and 2- Top chicken salad over a bed of lettuce


Cycle 3- Top chicken salad over 1/2 whole grain bagel, a whole wheat tortilla pocket or whole wheat tortilla


Buffalo Chicken Salad with Greek Yogurt - modified for the 17 Day Diet

Photo courtesy of Judy H. Judy is a member of my private FB group and she’s always using Sunburst tomatoes for garnish in her photos! Thanks, Judy! Looks delish!


Original article and pictures take 17ddblog.com site

четверг, 10 июня 2010 г.

Buffalo Chicken Meatballs with Roasted Cabbage and Blue Cheese Dressing

Buffalo Chicken Meatballs with Roasted Cabbage and Blue Cheese Dressing

This recipe was a huge hit with my 17DD Blog Facebook Community. I featured this 17 Day Diet recipe in the Spring C1 Challenge and also shared this with my Simply17 monthly meal planning members.


Remember not to handle the chicken too much, or it may turn out dry and tough. Get it all mixed together as quickly and gently as possible.


Some members reported that their meatballs were a bit spicy, so if you’re not a super fan of spicy food, either cut back on the hot sauce, use half hot sauce and half of your favorite low-sugar barbecue sauce, or simply make a bit more of the Greek Yogurt Blue Cheese Dressing! Enjoy!


Slow Cooker Buffalo Chicken Meatballs


Ingredients:


1 pound lean ground chicken

½ onion, minced or grated

1 teaspoon garlic powder

1 teaspoon onion powder

Salt and Pepper

Olive Oil

1 cup Frank’s Red Hot Sauce


Directions:


Mix all ingredients together except hot sauce. Roll chicken into 1 oz balls for a total of 16 or so.


Heat olive oil in a large pan on medium heat. Add chicken balls to pan and brown slightly on all sides.


Transfer chicken to slow cooker and add hot sauce. Cook on low for 2 hours or until chicken is cooked through.


Please note: If you don’t have a slow cooker, brown the meatballs as per the directions, and then add the meatballs and hot sauce to a dish and bake in an oven heated at 350 degrees F and bake anywhere from 15 to 30 minutes, depending on how much you browned them in the pan.


Yields 4 Servings


Roasted Cabbage Wedges


Ingredients:


1 tbsp plus 2 more tbsp extra-virgin olive oil

1 medium head green cabbage, cut into 1-inch-thick rounds

Coarse salt and ground pepper


Directions:


Preheat oven to 400 degrees F.


Brush a rimmed baking sheet with 1 tbsp extra-virgin olive oil. Place 1 medium head green cabbage, cut into 1-inch-thick rounds, in a single layer on sheet and brush with 2 tbsp oil.


Season cabbage with coarse salt and ground pepper.


Roast until cabbage is tender and edges are golden, 40 to 45 minutes.


Drizzle a bit of blue cheese dressing (optional)


Yields 4-5 Servings


Greek Yogurt Blue Cheese Dressing


Ingredients:


½ c plain Greek Yogurt

1 Tablespoon apple cider vinegar

1 Tablespoon olive oil

Salt and Pepper, to taste

¼ teaspoon dry mustard

1/4 cup crumbled low-fat blue cheese


Directions:


Combine all ingredients together except blue cheese and mix well. Gently fold in blue cheese.


All recipes are approved for all cycles


Buffalo Chicken Meatballs with Roasted Cabbage and Blue Cheese Dressing

Photo Courtesy of Michelle S., a member of my 17DD Blog Facebook Community


Original article and pictures take 17ddblog.com site

четверг, 3 июня 2010 г.

Bruschetta Stuffed Balsamic Chicken

Bruschetta Stuffed Balsamic Chicken
Bruschetta Stuffed Balsamic Chicken is a savory dish that is healthy for all cycles of the 17 Day Diet

During my latest 5-Day Dinner Party for the re-opening of my weekly meal planning service for the 17 Day Diet called Simply17, one of our entrees was this delicious Balsamic Chicken stuffed with a yummy tomato and cheesy mixture. The sweetness of balsamic made this dish a hit!


You can prepare the recipe as-is by stuffing your chicken breasts, or top your chicken breasts with the tomato and cheese mixture instead. Either way, this dish is tasty!


Bruschetta Stuffed Balsamic Chicken


Ingredients:


2 tomatoes, diced

1/3 cup packed fresh basil ribbons

1 cup shredded low-fat mozzarella cheese, divided

4 skinless, boneless chicken breasts

salt and pepper, to taste

2 tablespoons olive oil

1/4 cup balsamic vinegar

1/3 cup low sodium, chicken broth

3 garlic cloves, minced

1 teaspoon Italian Seasoning


Directions:


Preheat oven to 350F.


In a large bowl add tomatoes and 1/2 cup of the mozzarella cheese and basil. Stir to combine. Set aside.


Depending on size of chicken breasts, place up to two breasts at a time in one large zip lock bag (or one breast in between two layers of plastic wrap) and pound until you achieve a 1/4-inch thickness. Be careful not to tear or rip through the chicken as you’ll be stuffing them!


Season chicken on all sides with salt and pepper, to taste.


Take your tomato mixture and spoon a generous portion over the top of each chicken breast. Reserve leftover tomato mixture for sprinkling over the top.


Gently roll up the chicken breasts, wrapping them tightly, and secure both ends with toothpicks to prevent chicken from unrolling while cooking.


In a large frying pan or oven-proof pan, heat olive oil on medium high heat.


Add rolled chicken breasts to pan and cook for about 6 to 7 minutes, or until all sides are lightly browned.


While chicken is browning, combine the balsamic vinegar, broth, garlic and seasoning to a bowl. Whisk until mixture is fully combined. Set aside.


Remove chicken from stove. Spoon remaining tomato mixture over chicken and gently pour balsamic vinegar mixture over chicken.


In your oven-proof pan or baking dish, place chicken in oven and bake for 20 minutes.


Flip chicken once and return to oven to continue baking for another 15 minutes.


Remove chicken from oven and top with remaining 1/2 cup of mozzarella cheese and return to oven to continue baking for an additional 5 minutes until cheese is melted and bubbly.


Remove from heat and let stand for a few minutes before serving. From pan, scoop remaining tomato and balsamic mixture and serve over chicken.


Note: If you want to make this dish a bit easier and save some time, rather than stuff the chicken, cook chicken breasts with mixture on top. It’s perfect either way!


Yields 4 Servings


Approved for all cycles


Here are a few photos from party guests:


Bruschetta Stuffed Balsamic Chicken

Photo above courtesy of Sandra J. – I love how Sandra’s chicken was stuffed perfectly! What a beauty!


Bruschetta Stuffed Balsamic Chicken

Photo above courtesy of Molly C. – I loved Molly’s creation, along with her use of our Simply17 cards where she displayed the name of the dish. So creative!!


Original article and pictures take 17ddblog.com site